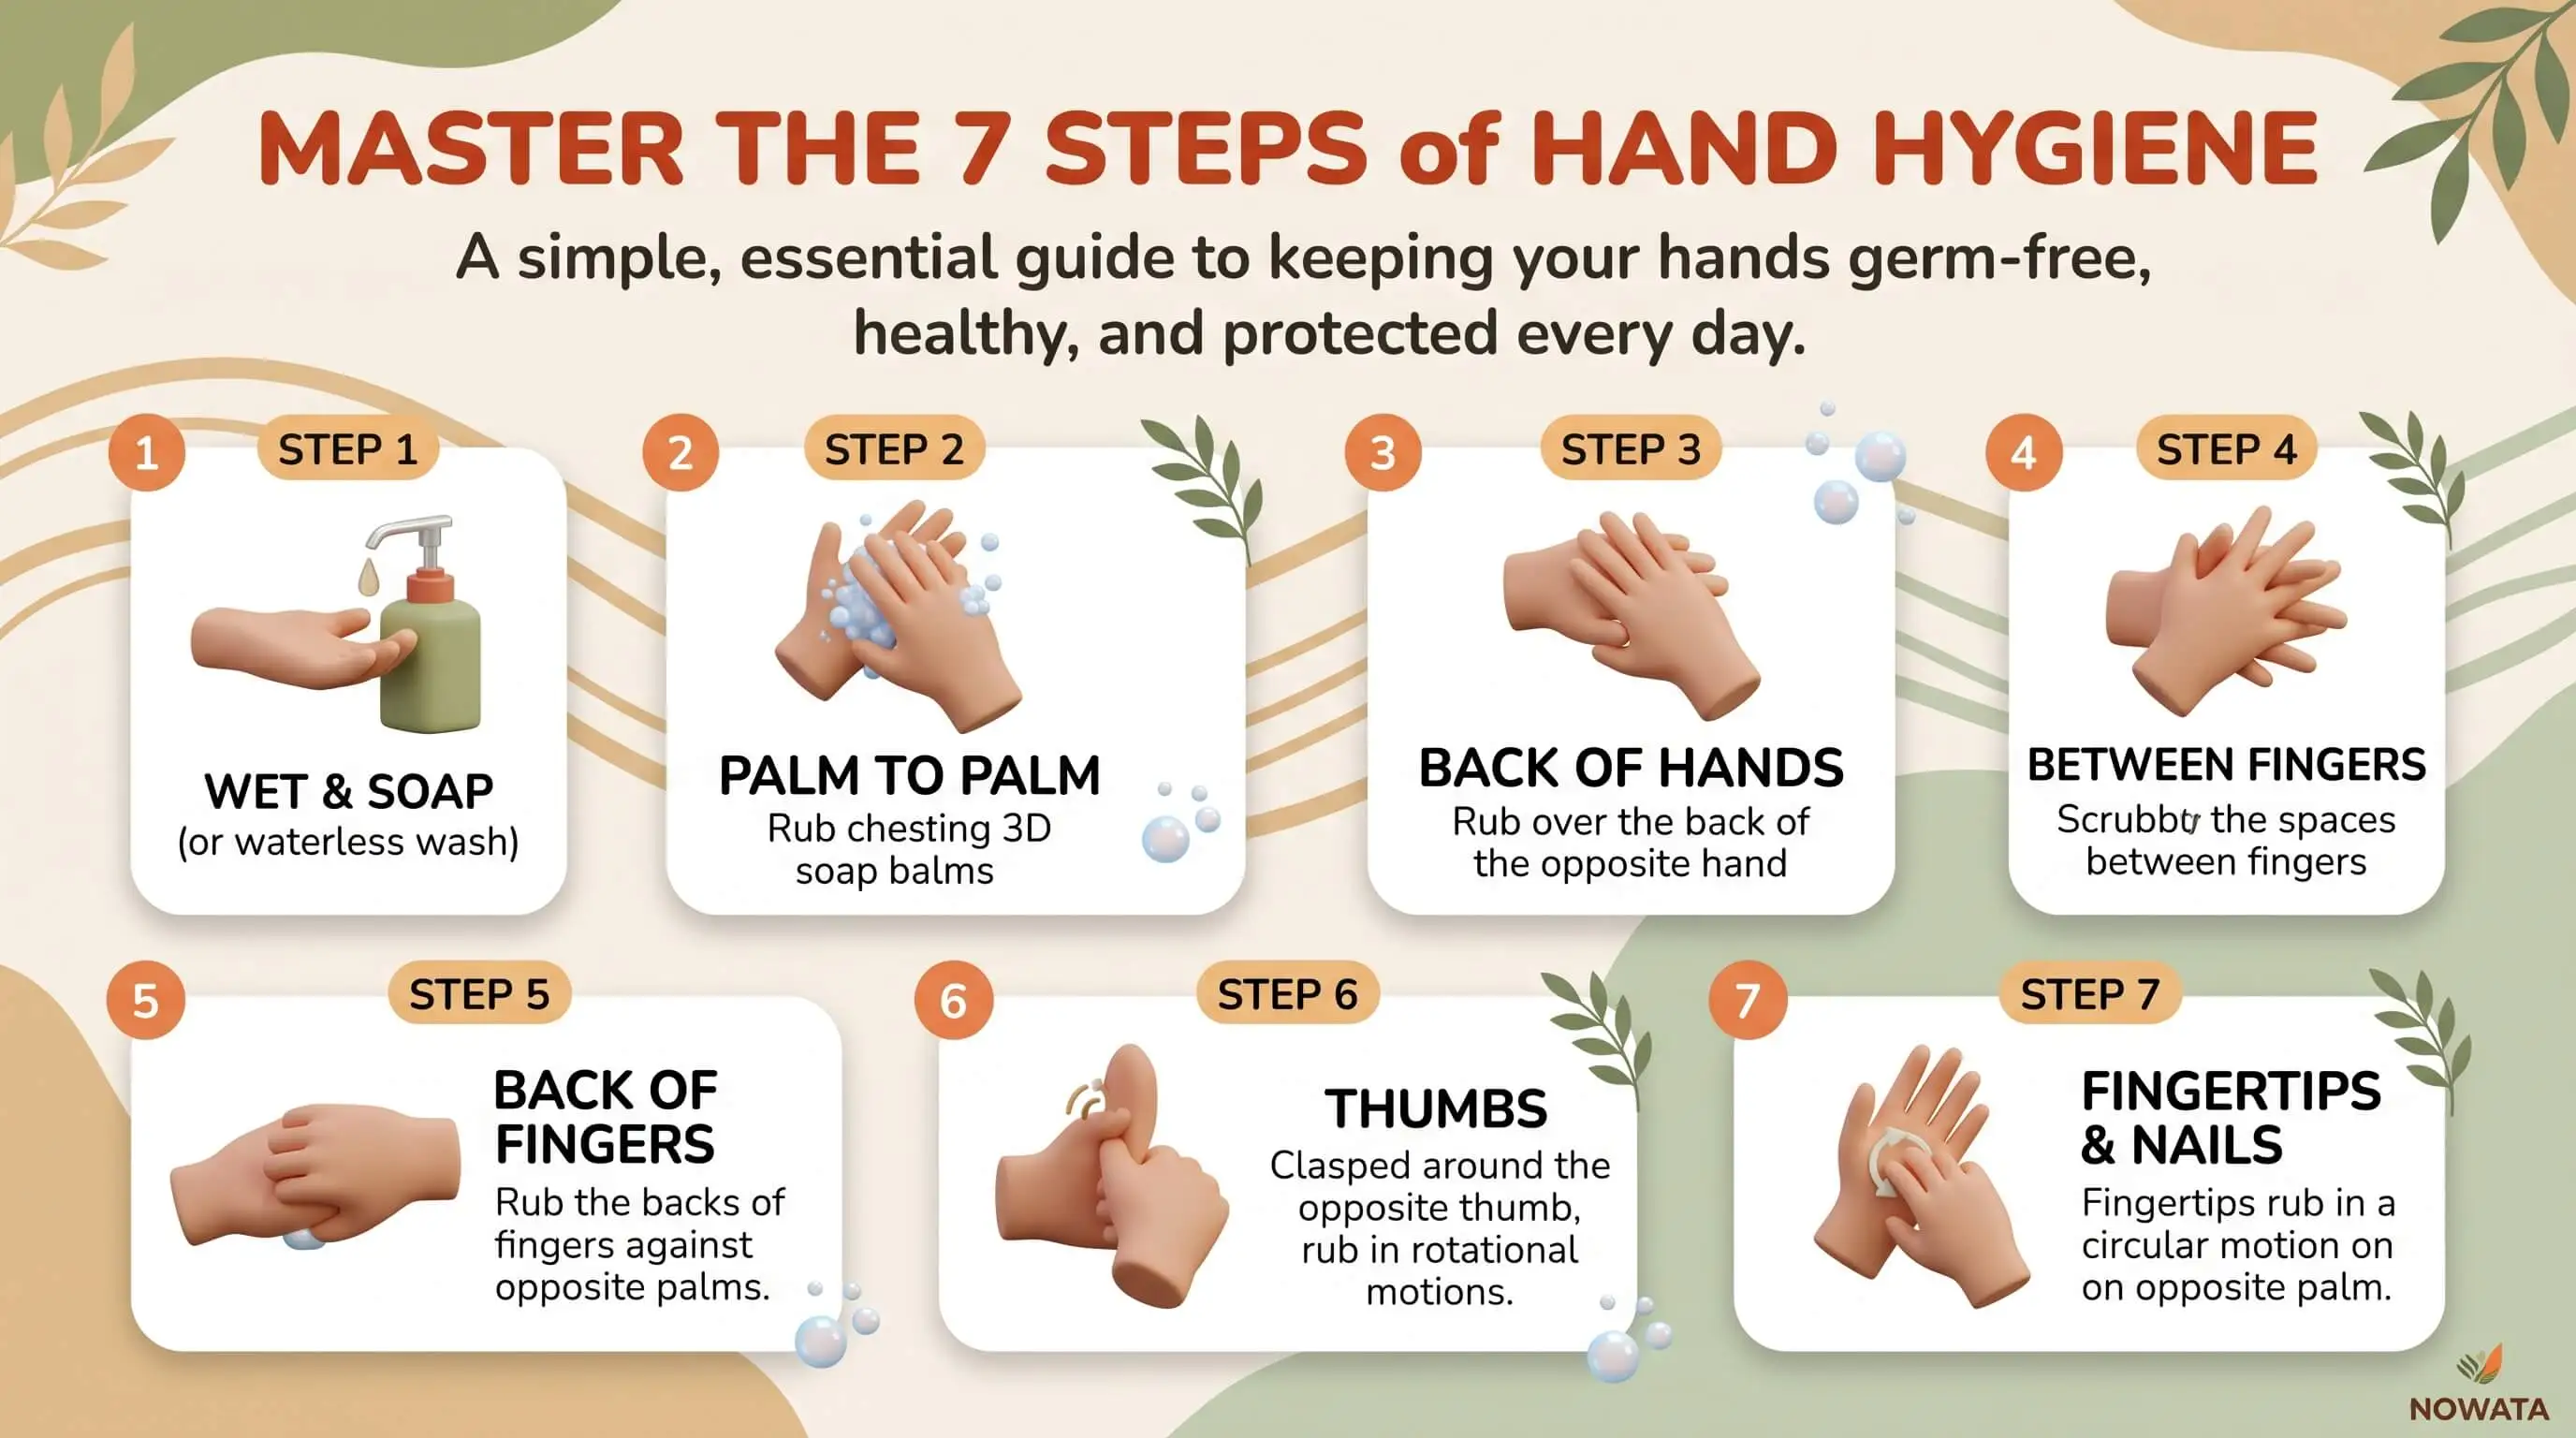
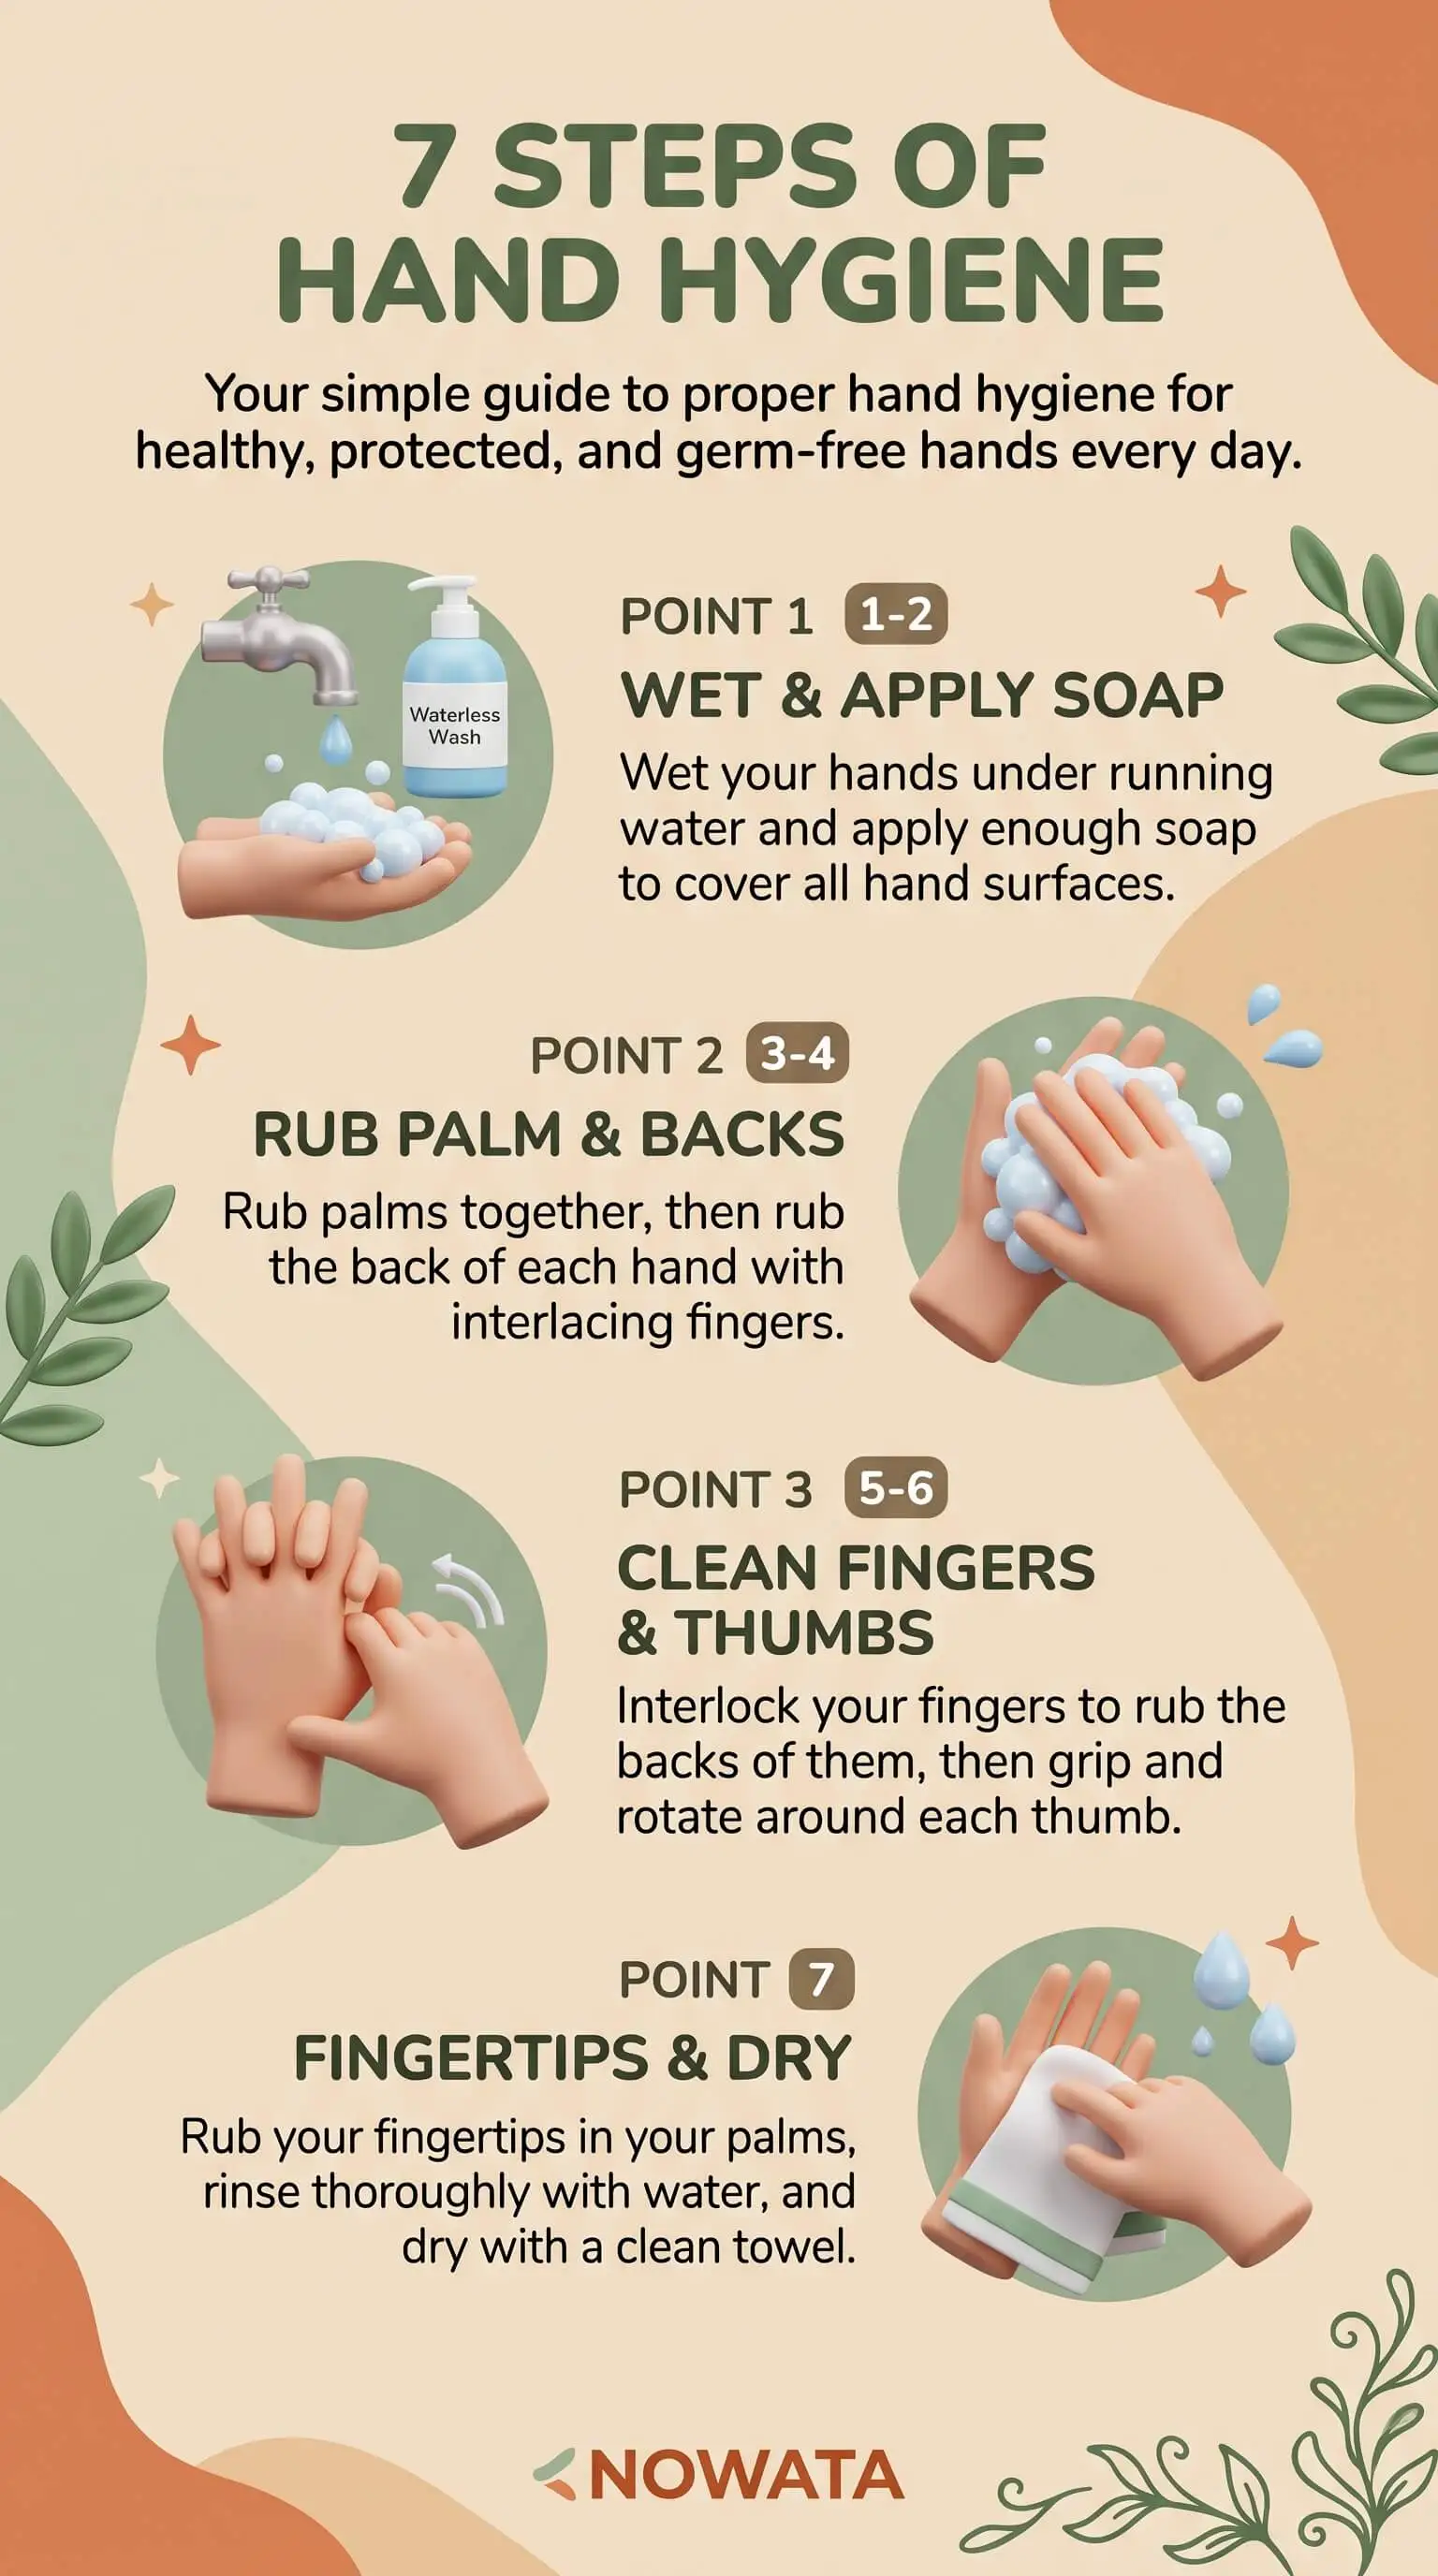
That gap is exactly what the 7 steps of hand hygiene close. They're seven rubbing motions that reach every surface of your hands: palms, backs of hands, between the fingers, backs of the fingers, thumbs, fingertips, and wrists. Wet your hands and add soap, scrub through all seven for at least 20 seconds, then rinse and dry.
TL;DR Quick Answers
7 Steps of Hand Hygiene
The 7 steps of hand hygiene are seven rubbing motions that reach every surface of your hands. Wet your hands, add soap, and scrub for at least 20 seconds:
Palms: rub palm to palm.
Backs of hands: lay one palm over the back of the other hand with fingers interlaced, then switch.
Between fingers: rub palm to palm with fingers interlaced.
Backs of fingers: lock your curled fingers into the opposite palm and rub side to side.
Thumbs: twist each thumb inside the other hand.
Fingertips and nails: scrub them in circles on the opposite palm.
Wrists: rotate each wrist inside the opposite hand.
Rinse with your fingertips pointing down and dry completely. The whole routine takes 40 to 60 seconds.
Where most people slip: thumbs, fingertips, and the backs of the hands get missed most, so slow down on steps 4 through 6.
No sink nearby: the same seven motions work with an alcohol sanitizer of at least 60% or a rinse-free soap, because access, more than knowing the steps, is what usually breaks the habit.
Six-step charts: the WHO and NHS versions stop at the fingertips, and adding wrists makes seven.
Top Takeaways
The 7 steps of hand hygiene are about coverage. Each motion reaches a part of the hand the others miss, so scrubbing harder won't make up for a skipped step.
Thumbs, fingertips, and the backs of your hands get missed most often.
Scrub for at least 20 seconds inside a full wash, rinse, and dry that runs about 40 to 60 seconds.
A six-step chart just stops at the fingertips. Add wrists and you have seven.
When there's no sink, use the same seven motions with alcohol sanitizer or a rinse-free soap.
Why the 7 Steps of Hand Hygiene Matter
Hands pick up whatever they touch and pass it along to the next thing. A quick rinse mostly cleans your palms, since that's the part we rub without thinking.
People figured this out a long time ago. In the 1840s, Ignaz Semmelweis got doctors in a Vienna maternity ward to clean their hands between patients, and deaths on the ward dropped sharply. You can read more about the history of hand washing if you're curious. What we understand much better now is where hands get missed. That's where technique earns its keep.
The 7 Steps of Hand Washing, One by One
Take off your rings if you can. Wet your hands under clean running water, warm or cold, and use enough soap to cover both hands front and back. Then do each motion on both hands before you move to the next.
Step 1: Rub Palms Together
Press your palms flat and rub back and forth until you've got a lather going. Most people do this part fine. The trouble is that a lot of us stop right here.
Step 2: Rub the Back of Each Hand
Lay your right palm over the back of your left hand, lace your fingers through, and rub. Switch hands. The backs of your hands touch doorknobs and countertops all day, and they're easy to skip.
Step 3: Clean Between Your Fingers
Palms together again, with your fingers interlaced this time. Slide them back and forth so the soap works into the webbing between your fingers, a warm, damp spot that rarely gets more than a splash.
Step 4: Rub the Backs of Your Fingers
Curl your fingers and hook them into the other palm, like you're locking hands with yourself, then rub side to side. This reaches your knuckles and the creases over each joint. It's where my glowing stripe was hiding.
Step 5: Clean Each Thumb
Wrap one hand around the opposite thumb and twist. Switch. Your thumbs sit off on their own, so palm-to-palm rubbing barely touches them, and they get missed more than any other part of the hand.
Step 6: Scrub Your Fingertips and Nails
Bunch your fingertips together and scrub them in small circles against your other palm, then switch. The CDC notes that germs gather in especially high numbers under the nails, which is why this step gets its own spot on the list.
Step 7: Finish With Your Wrists
Grab one wrist with the opposite hand and rotate. Switch. Wrists brush against counters, sleeves, and faces more often than you'd guess.
When you're done, rinse with your fingertips pointing down so the water runs off your hands instead of back toward your wrists. Dry them completely with a clean towel or a paper towel. Germs move more easily to and from damp skin, so this last part counts too.
How Long Should the 7 Steps Take?
Scrub for at least 20 seconds. That's the CDC's number, and two rounds of "Happy Birthday" gets you there. The World Health Organization's hand washing poster says 40 to 60 seconds, but that figure covers the whole routine, wetting, rinsing, and drying included. Both numbers are right.
A 30-second sand timer by the sink helps if counting gets old. With alcohol hand sanitizer, keep rubbing through the same motions until your hands are dry, which usually takes 20 to 30 seconds.
Why Some Charts Show 6 Steps Instead of 7
If you've seen a chart with six steps, you didn't misread it. The WHO and NHS guides both stop at the fingertips. Plenty of hospital and infection-control posters add wrists as step 7, and some guides count "wet your hands and add soap" as step 1.
The motions stay the same and only the numbering shifts. I add wrists because they pick up as much from daily life as the backs of your hands do, and the extra step costs you about four seconds.
Are You Doing Them Right? Six Common Mistakes
Rushing. Most of us quit well before 20 seconds. Lean on a song or a timer until the habit sticks.
Skipping thumbs. Give each one its own twist, every time.
Ignoring your nails. Rub your fingertips into your palm instead of just against each other.
Rinsing too early. Soap needs friction and a few seconds to lift grime before water can carry it off.
Using too little soap. If it doesn't reach the backs of your hands, pump again.
Drying on your jeans. Reach for a clean towel. And if all this washing leaves your skin cracked, a gentle soap for dry or sensitive hands makes the habit a lot easier to keep.
When to Use the 7 Steps
The WHO built its "5 Moments" framework for hospitals, but the logic carries over to an ordinary house. Wash at the times germs are most likely to hitch a ride:
Before eating or cooking
After the bathroom or a diaper change
After coughing, sneezing, or blowing your nose
After touching shared surfaces like grocery carts, door handles, or your phone
After handling pets, trash, or anything visibly dirty
How to Follow the 7 Steps When There Is No Sink
Plenty of those moments happen nowhere near a sink. Snack time at the playground, lunch at a trailhead, and the back seat at school pickup all come to mind. The doctors behind NOWATA cover this in their doctor-made guide to the 5 moments and 7 steps of hand hygiene, and their point stuck with me: access, more than awareness, is usually what gets in the way. It's worth a read if your family spends a lot of time out of the house.
Away from a sink, you've still got two good options:
Alcohol-based hand sanitizer. Pick one with at least 60% alcohol and rub through all seven motions until your hands are dry. It works best on hands that don't look dirty or greasy.
Rinse-free soap. Apply it to dry hands, work through the same seven motions, and brush off what's left. Here's how waterless no-rinse soap works if you haven't tried one. In lab testing, NOWATA's plant-based formula physically removed over 99.9% of tested virus and bacteria particles from skin, though the company is clear that the results don't imply disease prevention.
Either way, the technique doesn't change.
Clean Hands, Clean Air: Two Halves of Germ Control at Home
Germs get around a home in two main ways, by touch and through the air. Hand washing handles touch. Filtration and fresh air help with the other half by cutting down on the particles floating around your rooms.
You need both. A good purifier won't clean your fingertips, and perfect hand washing won't pull dust or dander out of the air. For a straight answer on where filtration helps and where it doesn't, here's what air purifiers can and can't do for your health.
Teaching the 7 Steps to Kids
Kids learn this faster when it feels like a game. Tell them to "put on invisible gloves" and cover every inch, then tape a picture of the steps by the sink at their eye level. For the ones who still sprint through it, these tips for kids who rush through washing help stretch it to the full 20 seconds.
"I've written about healthier homes for years, and I still assumed my own hand washing was fine until a blacklight showed glowing thumbs and fingertips on hands I'd just scrubbed. Since then I've tested the routine with my family and laid the WHO, CDC, and NHS charts side by side. In my experience, people miss spots because nobody ever showed them where to look, not because they don't care. Once you know steps four through six are where the misses happen, you slow down there, and that one change does more for clean hands than switching soaps ever will."
7 Essential Resources
These are the pages I go back to when I want the steps straight from the source:
WHO: How to Handwash (poster). The original illustrated sequence with the 40 to 60 second timing. Print it and tape it by the sink.
NHS: How to Wash Your Hands. A short video plus photos of every motion, and a good reminder to take your rings off first.
CDC: About Handwashing. Plain-language basics on when to wash, the 20-second scrub, and when sanitizer makes a fair backup.
CDC: Handwashing Facts. The reasoning behind each instruction. I learned here that water temperature matters a lot less than most of us think.
WHO: Five Moments for Hand Hygiene. The framework behind when to wash, written for hospitals and easy to adapt at home.
WHO Guidelines on Hand Hygiene in Health Care. All 270 pages of the evidence. It's dense, but it's where the technique comes from.
Global Handwashing Partnership: Resources. Free fact sheets, research summaries, and Global Handwashing Day materials that teachers and community groups can use.
These seven trusted resources from the WHO, NHS, CDC, and Global Handwashing Partnership explain proper handwashing techniques, recommended washing times, and hygiene practices. They also offer helpful guidance for maintaining clean hands when using natural non toxic hand soap as part of your daily routine.
3 Statistics
These numbers are why I think technique deserves as much attention as the habit itself:
Knowing the steps doesn't mean doing them. In a 2025 survey of 3,587 U.S. adults, 62% knew that 20 seconds with soap and water cuts the spread of germs. Even so, 48% admitted they forget or choose not to wash at key times, like after the grocery store or a doctor's visit. (NFID 2025 State of Handwashing Report)
Fewer colds make the rounds. Handwashing education in the community cuts respiratory illnesses like colds by 16 to 21%. In a house where one cold tends to work its way through everybody, that adds up fast. (CDC Handwashing Facts)
Most of the world skips it. The CDC estimates that only 19% of people worldwide wash their hands after using the toilet. A steady seven-step routine at home puts your family far ahead of that. (CDC Handwashing Facts)
Final Thoughts and Opinion
After a lot of glowing thumbs in my house, I've landed on this. Most of us don't need one more reminder to wash our hands. We need someone to point out where the wash falls short. Palm-to-palm rubbing feels thorough, so we stop there, and our thumbs, fingertips, and knuckles barely get touched.
I'd take all seven steps at an easy pace over five seconds of hard scrubbing any day. Slow down on steps four through six. Do it where your kids can see you, because they copy what you do long before they listen to what you say.
A missing sink shouldn't end the routine either. The motions work the same with sanitizer or a rinse-free soap, which is exactly why one lives in my car's cup holder now.
Frequently Asked Questions
What are the 7 steps of hand hygiene?
The 7 steps of hand hygiene are rubbing your palms together, rubbing the back of each hand, cleaning between your fingers, rubbing the backs of your fingers, twisting each thumb, scrubbing your fingertips in the opposite palm, and rubbing each wrist. Wet your hands and add soap before you start. Rinse and dry when you're done.
How long should the 7 steps of hand washing take?
Scrub for at least 20 seconds, about two rounds of "Happy Birthday." The WHO puts the whole routine at 40 to 60 seconds once you count wetting, rinsing, and drying. If you're using alcohol sanitizer instead, keep rubbing until your hands are dry, which usually takes 20 to 30 seconds.
Is the 7th step wrists or fingertips?
That depends on the chart you're looking at. The WHO and NHS guides end with the fingertips, while many hospital training posters add wrists as step 7. Some guides also count wetting and soaping as step 1. The motions themselves don't change, and cleaning your wrists only adds a few seconds.
Do the 7 steps apply to hand sanitizer?
Yes. Use enough alcohol-based sanitizer, with at least 60% alcohol, to cover both hands, then work through the same seven motions until your skin is dry. Sanitizer does its best work on hands that don't look dirty or greasy. When your hands are visibly grimy, soap and water is the better call.
Which parts of the hands do people miss most?
Thumbs, fingertips, and the backs of the hands. Your thumbs sit apart from your other fingers, so rubbing your palms together barely reaches them. Steps four through six exist to cover exactly these spots, which makes them the ones worth slowing down for.
Should I use warm or cold water?
Use whichever you like. According to the CDC, water temperature doesn't appear to change how many germs come off. Soap, friction, and time do the work. Warmer water can irritate your skin more if you wash often, so lukewarm or cool is perfectly fine.
Do I really need to dry my hands after washing?
Yes. Germs move more easily to and from wet hands, so drying finishes the job. Grab a clean towel or a paper towel. Wiping your hands on your clothes or a damp shared towel can undo a lot of what you just accomplished at the sink.
Your Next Step
Tonight, wash your hands once slowly, going through all seven steps in order, and notice which one feels unfamiliar. For most people it's the thumbs or the backs of the fingers. Practice that one until you stop thinking about it.
Then make it easy to remember. Print the WHO hand washing poster for your bathroom, and keep a rinse-free option in your bag or car for the times the nearest sink is a five-minute walk away.